Pages

Sunday, October 27, 2013

Tutorial: Cupcake Nail Art

Good morning! How about some yummy cupcakes for Sunday? :D
I love cupcakes, and today I am bringing you my take on cupcake nail design!
Hope you like it!


♥♥♥ Products Used ♥♥♥ 
---
{Sprinkles/polka dots}
---
Sinful Colors Ruby Ruby (red heart) 

Quite a list! XD but you can simplify the sprinkles part by limiting to just 1 color. I like mine very colorful :D


Thanks for checking! Have a sweet day! 

Tutorial: Halloween Ghost Nail Art (Easy & Cute)

Hello ladies! and happy Sunday! Are you all ready for the spooky day...or night? Today I wanted to share with you my final installment of Halloween nail art for this year. Check it out!


♥♥♥ Products Used ♥♥♥
♥ Wet n Wild Bow in my Presence (similar)


Remember you can always switch up the colors.
Below is a simpler black and white combo: on my ring finger, I used Sinful Colors Black on Black, and then layered Revlon Scandalous on top. 


Hope you like it!
Have a Happy Halloween :D

Tuesday, October 1, 2013

Breast Cancer Awareness Nail Art


Hi everyone! October is Breast Cancer Awareness Month. In the video below, I'll show you how to create this pink ribbon nail art. Hope you like it. 


♥♥♥ Products Used ♥♥♥
♥ OPI Nail Envy http://amzn.to/18VEGNu
♥ Sinful Colors Snow Me White http://amzn.to/17QYwMK
♥ Revlon Brilliant Strength Enamor http://amzn.to/18lhwz2
♥ Seche Vite Top Coat http://amzn.to/17XCfLt
♥ Nail Art Dotting Tools http://amzn.to/15SzMpx

Saturday, September 28, 2013

Pumpkin Nail Art (Short Nails) { Halloween }


So early this week I broke my index finger nail ((◕︵◕)), almost 1/3 way through my nail line. I had to cut it shorter before it gets worse, ie: tear into my nail bed. I thought I'll just trim all nails shorter. I felt great to have shorter nails because it's easier to do things, thought longer nails make feel I have longer looking finers...hahaha... Anyways, today's post is about a pumpkin nail art I did this week in preparation for halloween. Hope you like it. ^_^

Watch the video below to see how it's done (〃^∇^)οΎ‰


♥♥♥ Products Used ♥♥♥
♥ OPI Nail Envy http://amzn.to/18VEGNu
♥ Orly Truly Tangerine http://amzn.to/1b783CC
♥ Essie Very Structured http://amzn.to/1fKbm2Q
♥ Sinful Colors Black on Black http://amzn.to/17ZZh4e
♥ Seche Vite Top Coat http://amzn.to/17XCfLt
♥ Nail Art Dotting Tools 
http://amzn.to/15SzMpx 


Thanks for checking. Have a great weekend! ♥♥

Thursday, September 19, 2013

Cute Bow Nails


Hi everyone! Today I wanted to share with you on how to create this adorable bow nails. I love bows and I love nude polishes. I think the combination of these two makes it perfect to wear for fall! It has a clean and chic look with a touch of bow cuteness and trendy metallic half moon element. Very sophisticated and I absolutely love it!!! Hope you liked it, too. ^_^


♥♥♥ Products Used ♥♥♥
♥ OPI Nail Envy http://amzn.to/18VEGNu
♥ Sally Hansen Xtreme Wear Golden-I http://amzn.to/186VXlP
♥ butter LONDON Yummy Mummy http://amzn.to/1dq7Hp5
♥ Sinful Colors Black on Black http://amzn.to/17ZZh4e
♥ Seche Vite Top Coat http://amzn.to/17XCfLt
♥ Hole reinforcement stickers http://amzn.to/18a4lF6
♥ Nail Art Dotting Tools http://amzn.to/15SzMpx

Monday, September 16, 2013

Blood Splatter Nails / Halloween Nails (No Tools Needed & Mess Free!)


Hello everyone! Today I have another Halloween Nails to show you! In the video below, I will show you how to easily create this Blood Splatter Nails. It's super super easy and requires no professional nail art tools. You only need white and red polish to achieve this design. Plus, it's mess-free because you're using your polish brush to create blood splatters instead of a straw or a toothbrush. Hope you liked it ^_^


♥♥♥ Products Used ♥♥♥
OPI Nail Envy http://amzn.to/18VEGNu
Sinful Colors Snow Me White http://amzn.to/17QYwMK
Sephora by OPI Personal Shopper
Seche Vite Top Coat http://amzn.to/17XCfLt

Sunday, September 15, 2013

Falling Glitter Nails (No Tools Needed!!!)


Hello everyone! Today I wanted to share with you a girly & sparkly Falling Glitter Nails I did over the weekend. I think it's so pretty and girly. It's perfect for Valentine's Day, or anytime you want to have some girly sparkles on the nails. Plus, you don't need any nail art tools to achieve this design. Gotta love that! 


♥♥♥ Products Used ♥♥♥

♥ OPI Nail Envy http://amzn.to/18VEGNu
♥ Revlon Brilliant Strength Enamor http://amzn.to/18lhwz2
♥ Sally Hansen Xtreme Wear Golden-I http://amzn.to/186VXlP
♥ Sinful Colors All About You http://amzn.to/15w9I19
♥ Seche Vite Top Coat http://amzn.to/17XCfLt

Friday, September 13, 2013

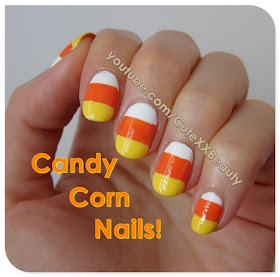
Candy Corn Nails / Halloween Nails (No Tools Needed!!!)


Happy Friday (the 13th), everyone! Second post today - Candy Corn Nails! I know it's still a little bit early for Halloween, but before we know it, Halloween is next month!!! This candy corn nails are so cute. You don't need any tools (striper brush, tapes etc) to achieve this nail art, though it takes some practice. At the end...don't bite your fingers...hahaha


♥♥ Products Used ♥♥

♥ OPI Nail Envy http://amzn.to/18VEGNu
♥ Sinful Colors Snow Me White http://amzn.to/17QYwMK
♥ Orly Truly Tangerine http://amzn.to/1b783CC
♥ Sally Hansen Insta-Dri Lightening http://amzn.to/1eFyC1H
♥ Seche Vite Dry Fast Top Coat http://amzn.to/17XCfLt

Simple Leopard Nails


Hello all! TGIF! I have 2 posts for ya today! First one is this Simple Leopard Nails. Personally I am not a huge fan of leopard prints, so I incorporated a pink nude polish with the leopard to make it look more feminine. I thought this was quite subtle and cute. Hope you like it.


♥♥ Products Used ♥♥

♥ OPI Nail Envy http://amzn.to/18VEGNu
♥ Sally Hansen Insta-Dri Quick Sand http://amzn.to/16nYMm2
♥ Sally Hansen Xtreme Wear in Golden-I http://amzn.to/186VXlP
♥ Sephora by OPI in I'm with Brad http://amzn.to/15nODpr
♥ Seche Vite Dry Fast Top Coat http://amzn.to/17XCfLt
♥ Nail Art Dotting Tools http://amzn.to/15SzMpx

Thursday, August 22, 2013

EOTD: Back to School (Work?)


My EOTD today... and probably...pretty much everyday if I have make up on XD I love neutrals....and I thought it's more than perfect for school and/or work as neutrals make the look more awake, natural and restful without looking over the top...

Monday, August 19, 2013

Cute and Easy Apple Nails (Back to School) {How to}


Since Back to School season is here, I thought I'd do a easy Back to School Apple Nails. It's super easy to create and looks cute on the nails!

Here's how:
1. Apple base coat. Then use your red polish brush to draw an apple. It's like drawing a heart shape. (don't worry if they are not symmetrical) 
2. Use a dotting tool dipped into brown polish, and draw a stem.
3. similar to step 2, use green polish to create a leave.
4. This step is optional, if you'd like to add a little bit of shine to your apples, simply use a smaller dotting tool dipped into white polish and draw an exclamation mark. Apply top coat and finished!

Products Used:


If you'd like to see how it's done in action, please watch the video tutorial below :)


Thursday, July 25, 2013

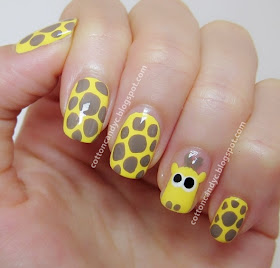
Cute Giraffe Nail Art Tutorial {How To}


Hello everyone! I recently went to the San Diego Zoo and was inspired to create this cute giraffe manicure, in a more cartoon-y look :) I think it's very fun and cute to wear, and it's quite simple to create, too!

Monday, July 22, 2013

Bear and Polka Dots Nail Art {How To}


Hello everyone! Today I'd like to show you a cute manicure I wore a while back. It's the bear & polka dots nails! I really love the combo of these two, super cute and girly.


Wednesday, July 17, 2013

Easy French Glitter Gradient Nails (No Tools Required!!) {How To}


Hello all! Long time no post. I felt it's been ages since my last nail art post. Today I wanted to show you an easy french glitter gradient nail art. No professional nail art tools required, all you need are nail polishes. 

so let's get started!

1. apply base coat
2. create silver french tip
3. take your glitter polish, and wipe off the excess. apply from the tip of your nail toward the cuticle . then slowly layer on more glitter polish at the tip.
4. apply topcoat. 

This manicure was so easy to create, I really enjoyed wearing them on the nails. They look so simple, clean and polished. Very girly and feminine. This manicure is also great for prom, bridal, party, night or special occasions. It's just very versatile! 


If you'd like to see how it's done in action, please watch the video below:


If you like this video, please thumbs up/like, favorite, and share. That will mean so much to me! 

Products I used in this video:
3. Wet n Wild coloricon Bow In My Presense (Be Jeweled Spring 2012 limited edition) 

Thursday, June 6, 2013

EOTD: L'Oreal Smoldering Plum Infallible Eye Shadow


In today's EOTD, I was trying to limit the number of items used on my eyes, but still able to complete a look.  I picked L'Oreal Smoldering Plum Infallible Eye Shadow because it is very pigmented, can be worn on its own and still look beautiful. So here it is...


Brows: Shiseido Natural Eyebrow Pencil in Natural Black, Maybelline Great Lash clear mascara
Base: MAC paint pot in Painterly
Lids: L'oreal Iced Latte Infalliable eye shadow (inner corner of the eyes), L'oreal Smoldering Plum Infalliable Eye Shadow, Urban Decay Foxy (browbone)
Eyeliners: Bobbi Brown Long-Wear gel eyeliner in Black Ink, Dolly Wink Liquid eyeliner, Sephora Flashy liner waterproof in Deep Black (waterline) 
Mascara: Maybelline falsie flared waterproof, false lashes


Thanks for checking. Have a good night ^_^


Wednesday, June 5, 2013

EOTD: Neutral (Revlon CustomEyes palette in 020 Naturally Glamorous)


A quick EOTD post.

Brows: Shiseido Natural Eyebrow Pencil in Natural Black, Maybelline Great Lash clear mascara
Lids: MAC paint pot in Painterly (base/primer), Urban Decay Foxy (brow bone), Revlon CustomEyes palette in 020 Naturally Glamorous
Eyeliners: MAC Fluidline, Dolly Wink Liquid eyeliner, Urban Decay 24/7 eyeliner pencil in mushroom (waterline)
Mascara: Maybelline falsie flared waterproof


Saturday, June 1, 2013

EOTD: Black gel liner with a dash of teal


June already? where has the month gone? I felt time goes faster and faster as you age... *_* 

This was my EOTD yesterday... I wanted to go for a neutral eye with a winged out eyeliner, in black, of course, but felt it was too boring so I layered Urban Decay Junkie (from Urban Decay 24/7 Ocho Loco eye pencil set) on top of my black gel liner. Junkie is a blueish teal with gold and teal sparkles. The overall eye look was still pretty natural and neutral, but with a tiny twist of color. 


I used:

Lids: UDPP, Urban Decay Naked 2 (Foxy - browbone, Half Baked - inner, Bootycall - all over lids, Snakebit - ouver v, Suspect - lids)
Eyeliner: MAC Fluidline, Urban Decay 24/7 eye pencil in Junkie, Urban Decay 24/7 eye pencil in mushroom (waterline + lower lash line), Dolly Wink liquid liner (to touch up)
Mascara: Maybelline falsie flared waterproof


In the meanwhile I also rediscovered my Revlon matte lip stick in Pink Pout, a natural nude-pink shade that softly brighten up the face :D


there you have it, EOTD + LOTD ha ha ha

thanks for checking, have a wonderful weekend! 


Thursday, May 30, 2013

Deal Alert: Make Up For Ever HD Complexion Starter Kit 20% Off + Free Shipping (Sephora)


Just saw this deal on Facebook and ordered mine immediately. I thought it's an awesome deal to share! Now until 6/5, get 20% off on this Make Up For Ever HD Complexion Starter Kit + Free Shipping on Sephora, Link Here

Code: HDSTARTER

that will bring your total from $79 to $63.20 (before tax) + you get free shipping! I love love love MUFE primer and foundation, it's amazing! You do the math, it's a great deal if you already love MUFE or if you want to try their products!! (ps: if you have ebates or fatwallet account, either one will give you another 4% cash back! so total of 24% saving!!)

This Starter Kit includes:

0.17 oz HD Microfinish Powder (1/2 full size) Product Link Here
HD KabukiBrush Product Link Here
0.5 oz HD Microperfectin primer (1/2 full size) Product Link Here
1.01 oz HD Invisible Cover Foundation (full size!!) Product Link Here


Saturday, May 25, 2013

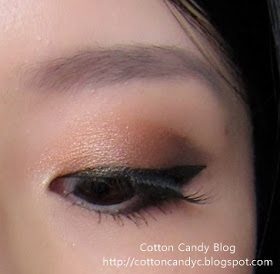
EOTD: Copper


A quick EOTD I wore to dinner today. I'm making an effort to use shadows I rarely use. Today I used Chopper from Naked 2 palette. Chopper is a orange toned copper shimmer with coppery micro-glitters. It's really a beautiful color. I just felt that it's too warm for my liking, but today I paired it with a deep brown shade and quite like how it turned out.


PRODUCTS USED:

BROWS: Shiseido Natural Eyebrow Pencil in Natural Black

EYES:
Base: Urban Decay Eyeshadow Primer Potion
Lids: Urban Decay Naked 2 (Foxy - browbone highlight, Chopper - from inner  to 2/3 of the lids, Busted - outer v), Urban Decay Midnight Cowgirl - inner corner of the eyes. Lower lash line: Busted + Blackout (from Naked2)
Eyeliner: MAC Fluidline in Blitz & Glitz
Mascara: Maybelline Falsies Flaredwaterproof + false lashes


num num num...had korean food tonight
spicy tofu stew, spicy pork bulgogi, side dishes 


Thanks for reading and I hope you all have a wonderful weekend ^_^


Friday, May 24, 2013

EOTD: Urban Decay Psychedelic Sister


Three EOTD in a roll? ha ha yes... I've been loving purple shadows lately and this is what's on my lids as I type... Urban Decay Psychedelic Sister eyeshadow is a medium to dark purple with iridescent violet sheen. To me this shadow is quite bright to wear on the daytime so I used Busted (a deep brown satin from Naked 2 palette) to balance it out a bit, hence added depth to the eyes.


PRODUCTS USED:

BROWS: Shiseido Natural Eyebrow Pencil in Natural Black

EYES:
Base: Urban Decay Primer Potion
Lids: Urban Decay Purple Haze (lightly all over lids for easier blending later on), Urban Decay Psychedelic Sister (from inner eyes to 2/3 of the lids), Urban Decay Busted (from Naked 2 palette, on the outer 1/3 of the lids), Urban Decay Polyester Bride (inner corner of the eyes), Urban Decay Foxy (from Naked 2, browbone highlight)
Eyeliner: MAC Fluidline in Blitz & Glitz
Mascara: Maybelline Falsies Flared waterproof + false lashes


Thanks for reading and have a great Memorial Day weekend!


Thursday, May 23, 2013

EOTD: Dior Amber Diamond


A while back I splurged on this gorgeous Dior shimmer powder in Amber Diamond and I love it so so so much. These shimmers are so beautiful and finely milled. It gives you a gorgeous and natural glow without the shiny glittery look some highlighters/shimmers do. I was playing with it today and using it as eyeshadow. I quite like it as eyeshadow but maybe I will incorporate with some matte shadows next time...   


BROWS: 
Shiseido Natural Eyebrow Pencil in Natural Black

EYES:
Base: Urban Decay Eyeshadow Primer Potion
Lids: Dior Shimmer Powder Amber Diamond, Urban Decay S&M
Eyeliners: MAC Fluidline in Blitz & Glitz, Dolly Wink Liquid Eyeliner
Mascara: Maybelline Falsies Flared waterproof, False lashes

Do you also use highlighters/shimmers as eyeshadows? 
Thanks for checking and have a lovely evening.


Tuesday, May 21, 2013

EOTD: Purple Haze


This was actually my "running errands" EOTD last Sunday. I was having a purple eyeshadow mood but wanted to have a natural daytime look.

Brows: Shiseido Natural Eyebrow Pencil in Natural Black

Eyes: 
Base: Urban Decay Eyeshadow Primer Potion. 
Inner corner of the eye: Urban Decay Midnight Cowgirl
Lids: I applied Bootycall (from Urban Decay Naked 2 palette) all over the lids and then layered Urban Decay Purple Haze. Then I dusted a bit of Pistol (Naked 2) on top of Purple Haze. And used Busted (Naked 2) lightly on the outer v for definition. For lower lash line: I used UD Purple Haze to line, and Busted (Naked 2) on the outer half. 

Browbones: Foxy (from Naked 2)
Eyeliner: Bobbi Brown gel eyeliner in Black Ink
Mascara: Maybelline Falsies Flared waterproof


Quite a few products I know. Sometimes it happens when I want to quickly create a simple look and end up using more products than I thought...XD

Thanks for looking and have a great day.


Sunday, April 14, 2013

Rosebud Three Layers of Lavish Lip Balm (Original/Strawberry/Minted Rose)

Rosebud Perfume Co. Three Layers of Lavish Lip Balm

Just wanted to do a quick review on this Rosebud lip balm set I got a while back on drugstore.com during their 20% off sale. My HG lip balm definitely goes to Rosebud Salve original lip balm! (I have a review post here) I think I probably have gone though almost 10 of this?! yes,that's how much I love this lip balm! When I saw this set on drugstore.com, I thought I'll like it since I like the original very much! This set includes: the original Rosebud Salve lip balm, Strawberry Lip balm, Minted Rose Lip Balm.

These lip balms come with a tin container which I think is very nice and cute! You can use it to store your lip balms or other tiny things.


Rosebud Perfume Co. Three Layers of Lavish Lip Balm

Rosebud Perfume Co. Three Layers of Lavish Lip Balm
Left to right: Original, Strawberry, Minted Rose


Original Salve Lip Balm: very moisturizing and long lasting. It has a very light rose scent, but nothing over the top. The pink color is only shown in the tin. When applied, I considered this as "transparent" (aka: clear), it's not even "sheer". 

Strawberry Lip Balm: This didn't disappoint me! It was a very yummy strawberry scent like candy, yet not too overpowering. If you love sweet scented lip balm, you will love this! It has a thicker texture than the original and Minted Rose, which is good if your lips are extremely dry. I found that the thicker texture lip balm stay on my lips longer. Same as the Original Salve lip balm, the color only show when in the tin, it did not provide any color to your lips. Also, the strawberry scent stays for almost an hour, quite long. I like to use this during the day time as I prefer very little to no scent lip balm on my lips when I go to bed. 

Minted Rose Lip Balm: This reminds me of Jack Black Intense Therapy Lip Balm SPF 25 in Natural Mint & Shea Butter which I also love for on the go during the day. The cooling sensation for this Minted Rose lip balm is not as intense/strong as the Jack Black one, but still nice enough. The cooling sensation stays on the lips for about 40 minutes or so and then disappear. This is also very moisturizing and give you very soft and supple lips. As for the color, it's clear to sheer depending on how thick you apply on your lips. If apply a thicker layer, it will give your lips some life back (if you have pale lips). I think this is perfect for warmer days or summer as it has the cooling feeling plus a very sheer color to the lips.


Rosebud Perfume Co. Three Layers of Lavish Lip Balm
swatches on paper.

Rosebud Perfume Co. Three Layers of Lavish Lip Balm
Ingredients

Rosebud Perfume Co. Three Layers of Lavish Lip Balm
Swatches on bare arm. Left to right: original, strawberry, minted rose.

Here are the swatches. As you can see here, original and strawberry are shown clear, while minted rose has a sheer pink when apply thicker. 

Overall I really love these lip balm, they work wonders and really inexpensive (I paid $12.80+tax for these three). I will definitely repurchase. Highly recommend!!!


Have you ever used Rosebud Lip Balm? What's your favorite?