
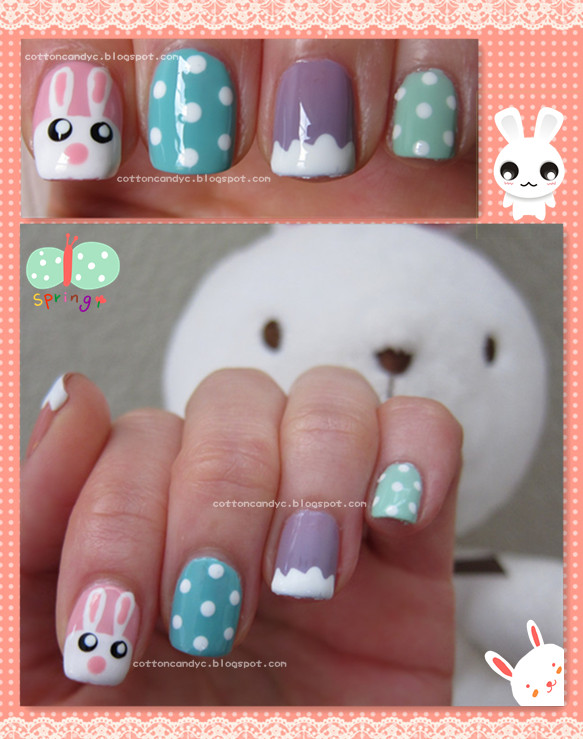
Hello ♥ How's your weekend? Mine was pretty well. Over the weekend I tried out this bunny nail art and absolutely love it. It might look a bit difficult to create but was actually quite simple. Today I'm going to show you step by step how to create this cute nail art. Even if you don't celebrate Easter, I think it's also great for spring because of the lovely pastel shades ♥
『(UPDATE 4-8-12) I uploaded a video tutorial on youtube, Click Here to watch ^-^』
『(UPDATE 4-8-12) I uploaded a video tutorial on youtube, Click Here to watch ^-^』


Products Used: (L to R)
upper:
essie protein base coat
Revlon Nail Enamel in Classy (review here)
Wet n Wild megalast in 218A I Need a Refresh-Mint (I used this in nail art here)
essence colour & go in 27 No More Drama
lower:
Sinful Colors in Black on Black (I used this in nail art here)
Sinful Colors in Snow Me White
Seche Vite Dry Fast Top Coat (my current favorite top coat!!)
and some different sizes of dotting tools (purchased from eBay, here very cheap and they work!)

1) Apply thin base coat to all nails, wait until dry.
2) Apply Revlon Classy on thumb nail (1 thick coat), Revlon Cafe Pink on index finger nail (3 coats), Wet n Wild I Need a Refresh-Mint on middle finger nail (2 coats), essence No More Drama on ring finger nail (2 coats), and Revlon Minted on little pinky nail (2 coats). *and then wait for all nails to dry*

3) Use Sinful Colors Snow Me White to draw bunny's head on index finger nail. Here I only used the brush that came with the nail polish as the brush was not too wide to draw.

4) Drop a little bit of white nail polish on a piece of paper, and use dotting tool (blue one, #5, smaller side) to draw bunny's ears, draw from cuticle side toward bunny's head. (If you're not confident enough, you can practice on the paper first, and then draw on the nail. This is also a great way to test out the stroke sizes, if too big or too small, you can change to another better size).

5) Use dotting tool (green, #3, smaller side) to draw cracked egg shape on ringer finger nail, and then fill the end with the same white. Wait until dry.

6) Use the same dotting tool (green, #3, smaller side) to create polka dots on middle and little pinky nails. Wait until dry.

7) The white nail polish on index nail (bunny head and ears) should be pretty dry by now, Use the smallest dotting tool (#1, white, smaller side) to draw pink inside bunny's ears. I used Revlon Colorstay in Cafe Pink. And then use different side (#1, white, bigger side) of the same dotting tool to draw bunny's nose. (Note: I like to wait for nail polish to dry or almost almost dry before layering on another color to avoid messing up the art that's already created)

8) Now for the cute part, bunny's eyes ^_^ ya and you're almost done! Use dotting tool (#1, white, bigger side) to draw bunny's eyes (Sinful Colors Black on Black), and smaller side of the dotting tool to draw white dots (Sinful Colors Snow Me White) inside the eyes.

9) Use dotting tool (#2, pink, smaller side) to draw cracked egg shape on the thumb finger nail, and fill with Sinful Colors Snow Me White to complete. Here's the finished look before top coat!!! Wait for them to dry a bit more before applying top coat.
10) Here's the finished look after Seche Vite Dry Fast top coat ^_^ Aren't they just so so so adorable!!!

Would you try this? what do you think of this nail art? and what others would you like to see? please let me know in the comments below. Thanks for reading!!! ♥
This design is way too cute but I doubt I can recreate it because I am such a novice at nail painting. Great tutorial though, I love Easter.
ReplyDeleteXoxo
Lizzo
I'm glad you like it ^^ thanks for visiting my blog.
DeleteYour bunny is so freaking adorable!!
ReplyDeleteThank you^_^
Deletebeautiful!...thank you for sharing this tutorial
ReplyDeleteREYAH'S PAGE
Thank you:)
Deletewere do u get the nail tools??
ReplyDeleteI got them on eBay for under US$2 which I think it's pretty cheap, use key word " nail dotting tool " and you should be able to find some sellers. You can also find them on Amazon! Hope this helps :)
DeleteLove these! And what an awesome tutorial! Nice work!! <3 The Sparkle Queen
ReplyDeleteThanks ^_^!!
Deletewow! yours is much prettier!! i also love creating nail designs every week!! love ur blog now following!! if you want you can visit mine and return the love if you like..kisses from brazil!!
ReplyDeletehttp://fashionettista.blogspot.com.br/
We really liked your Easter nail
ReplyDeleteart and would like to publish on www.ivillage.ca . Please let us know your response on kavita.dadhe@corusent.com